Punch it!: wooden Star Wars art with animated lights and sound.

“Punch it!”, Daniel D. Brown, 2019, handmade wooden multimedia intarsia artwork based on Star Wars.

See more video of lights & sound here

Design & Construction

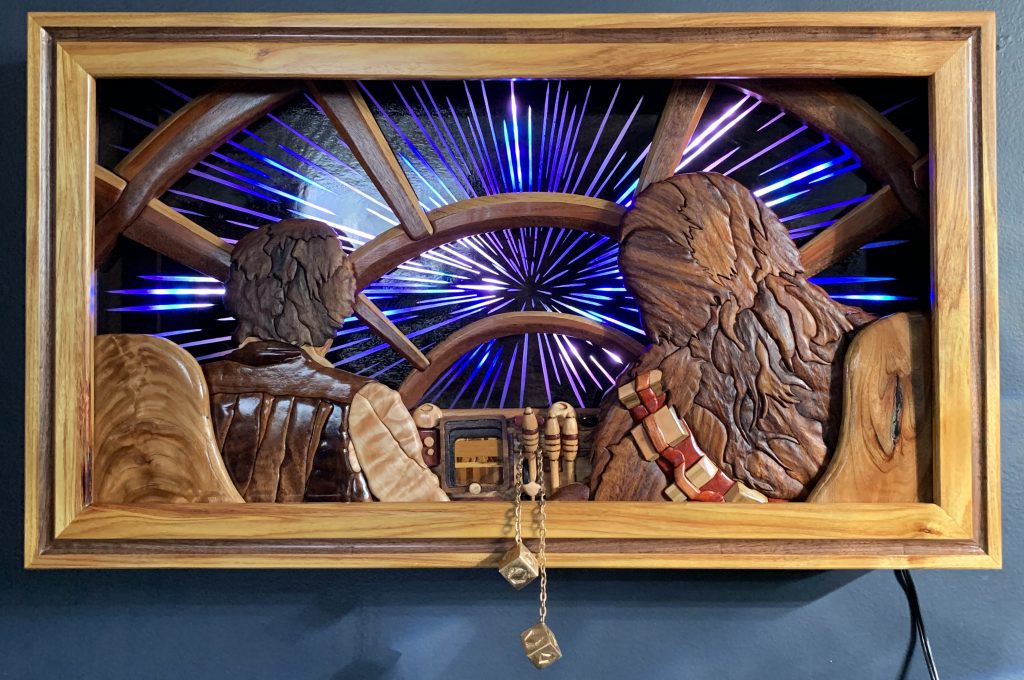
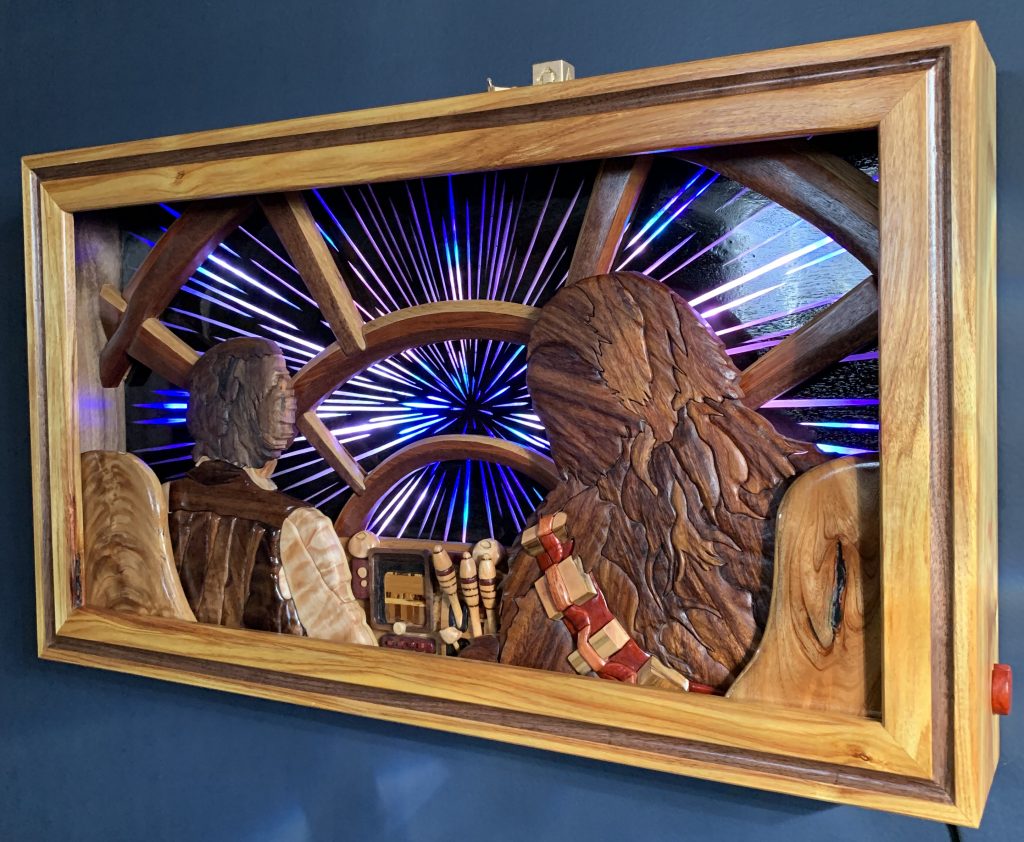
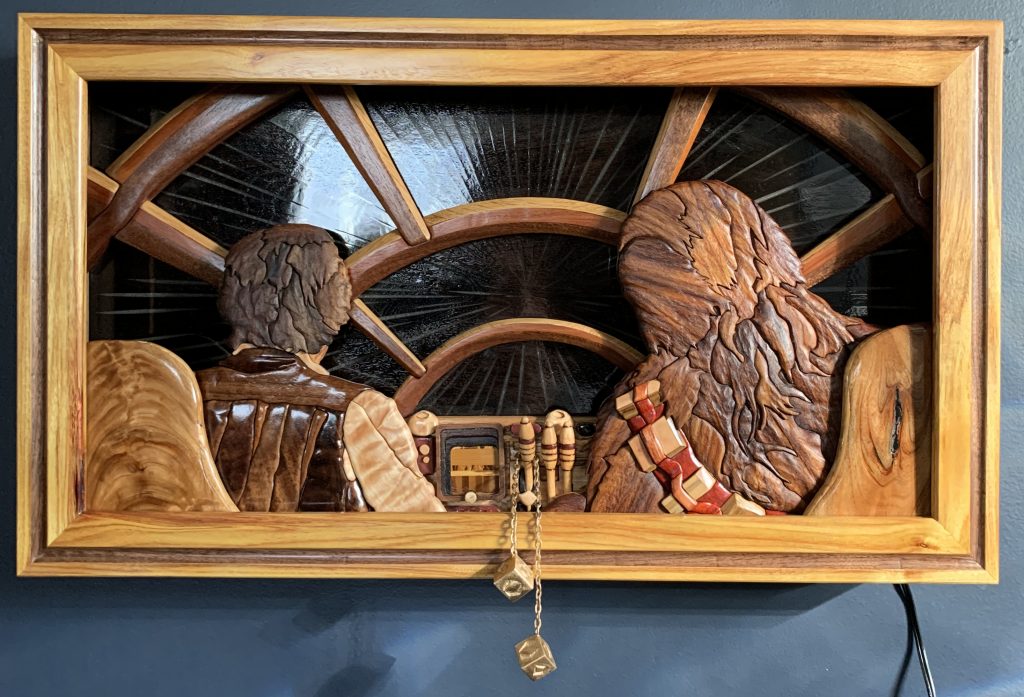
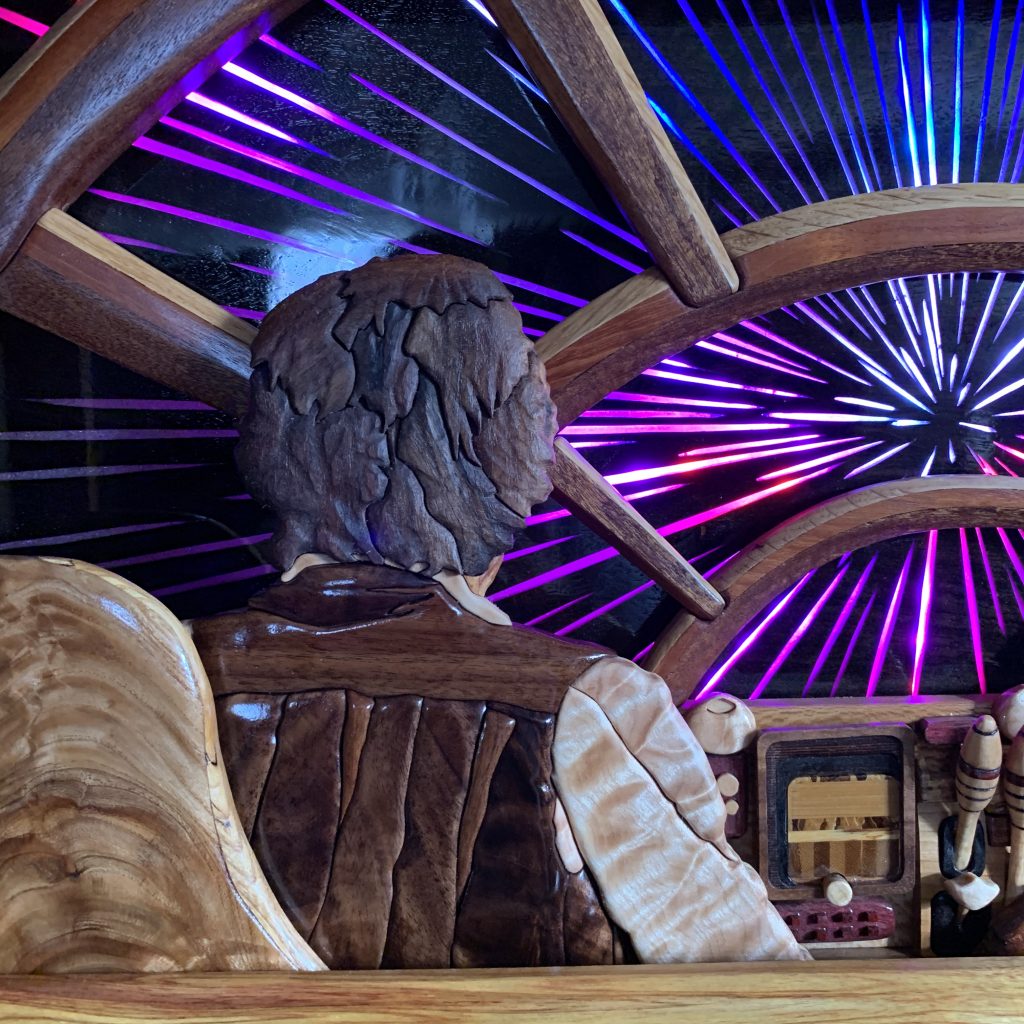
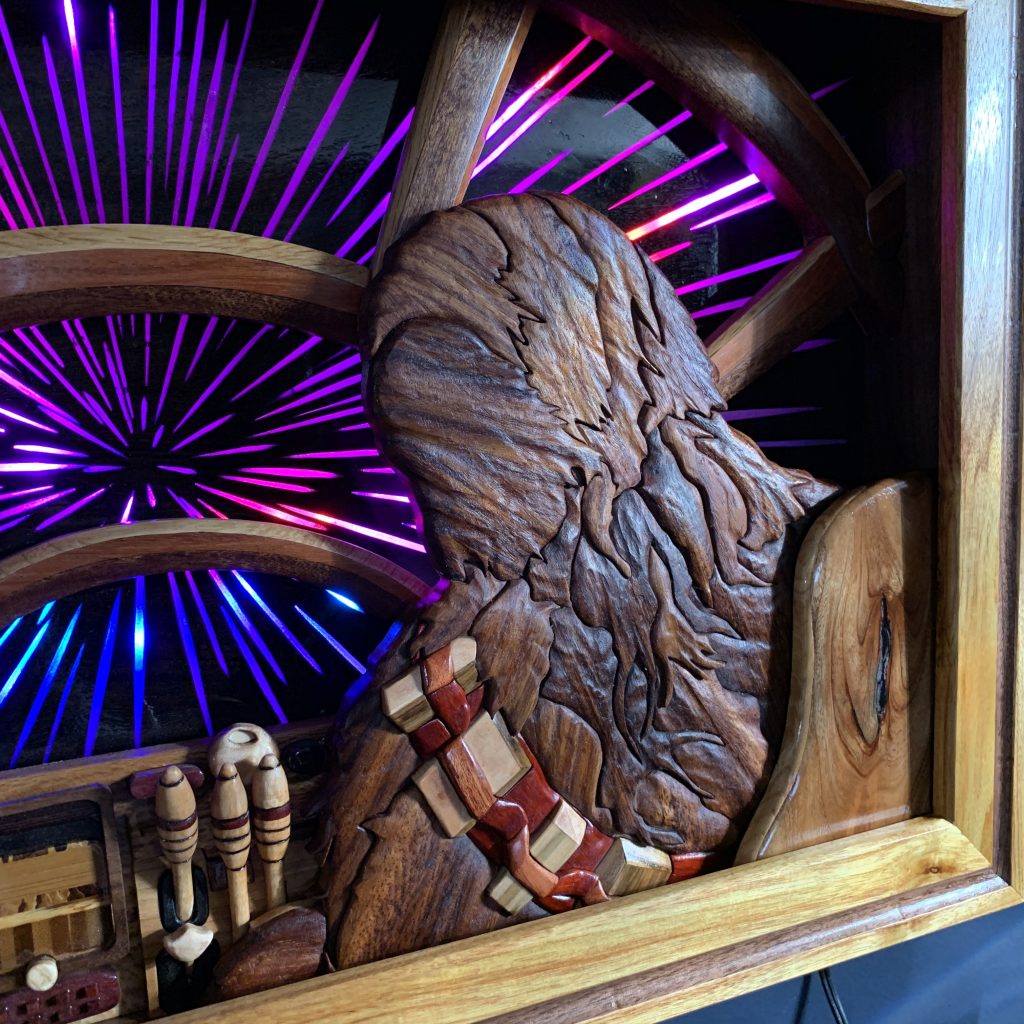
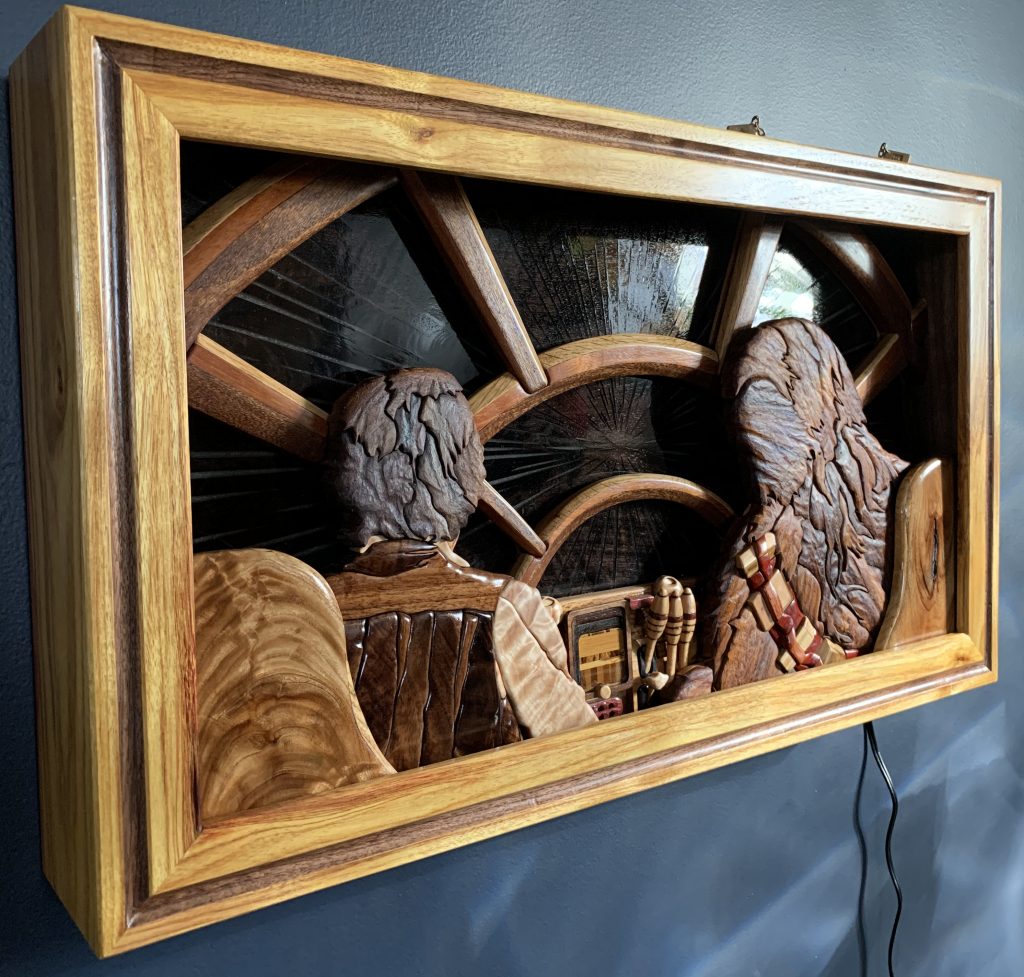
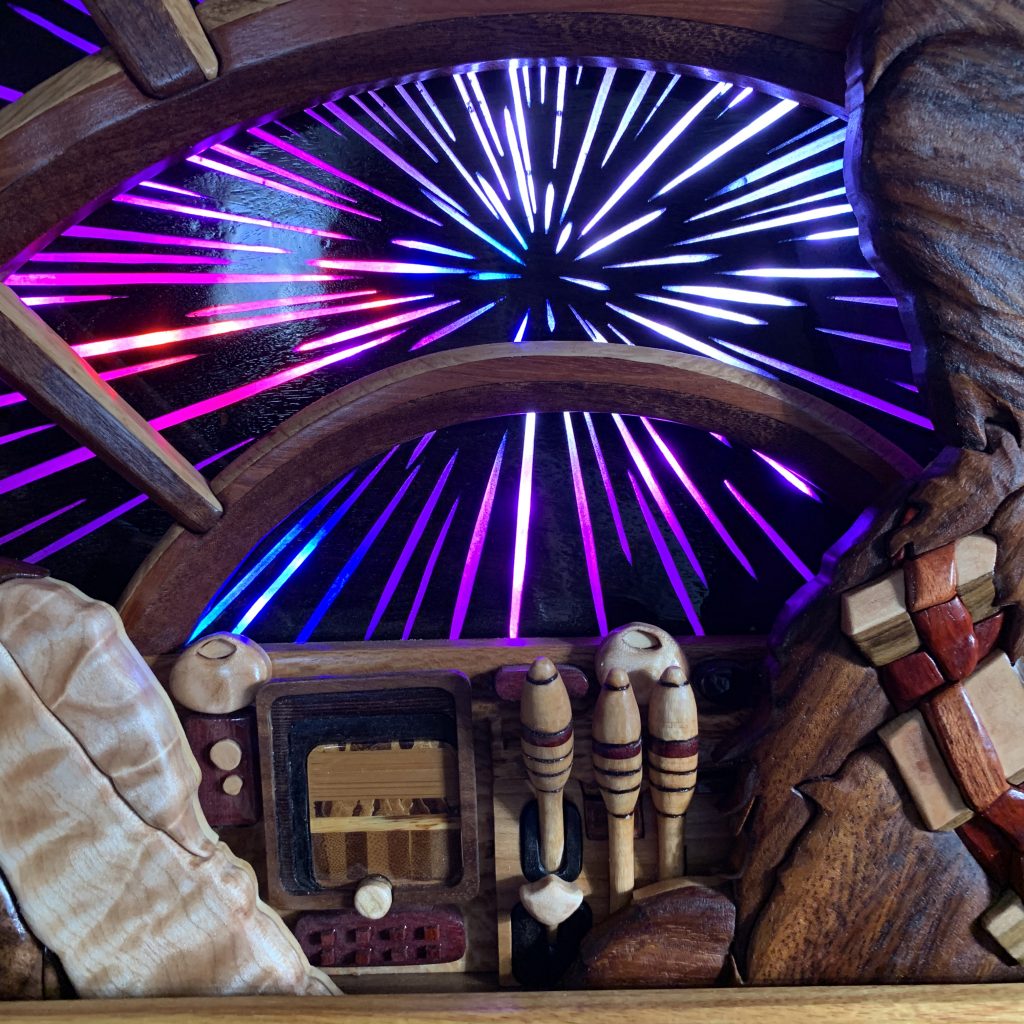
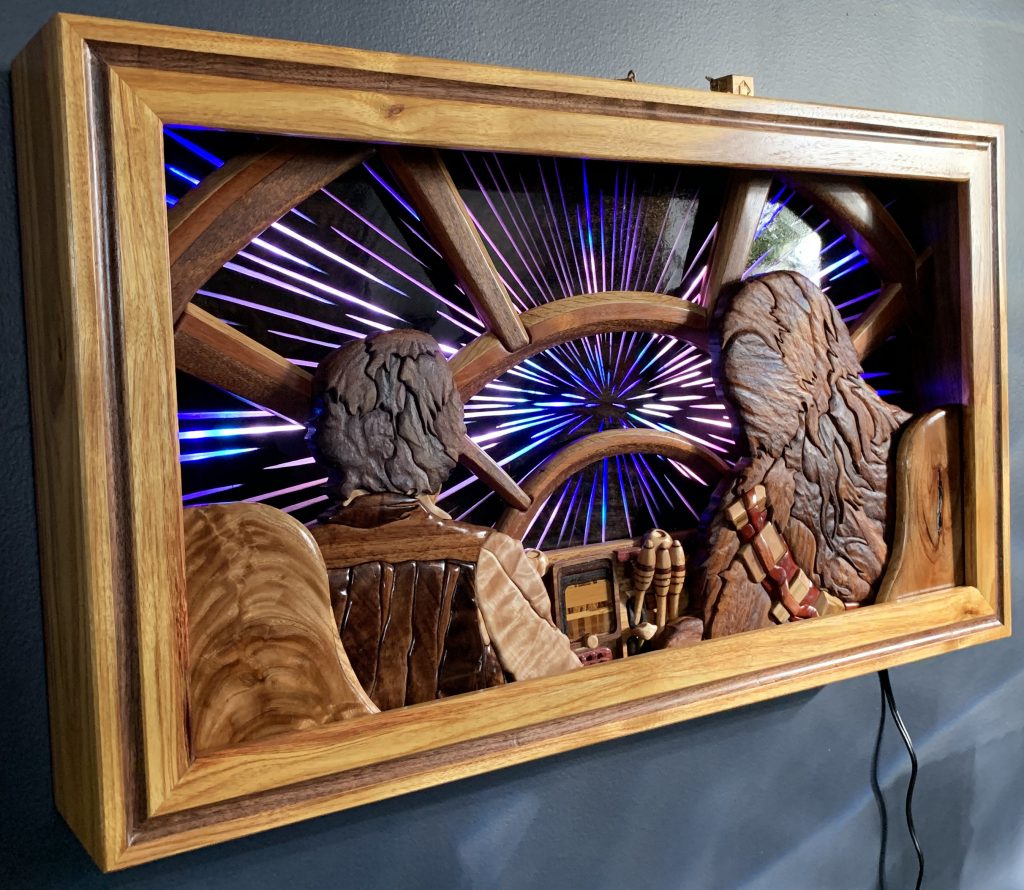
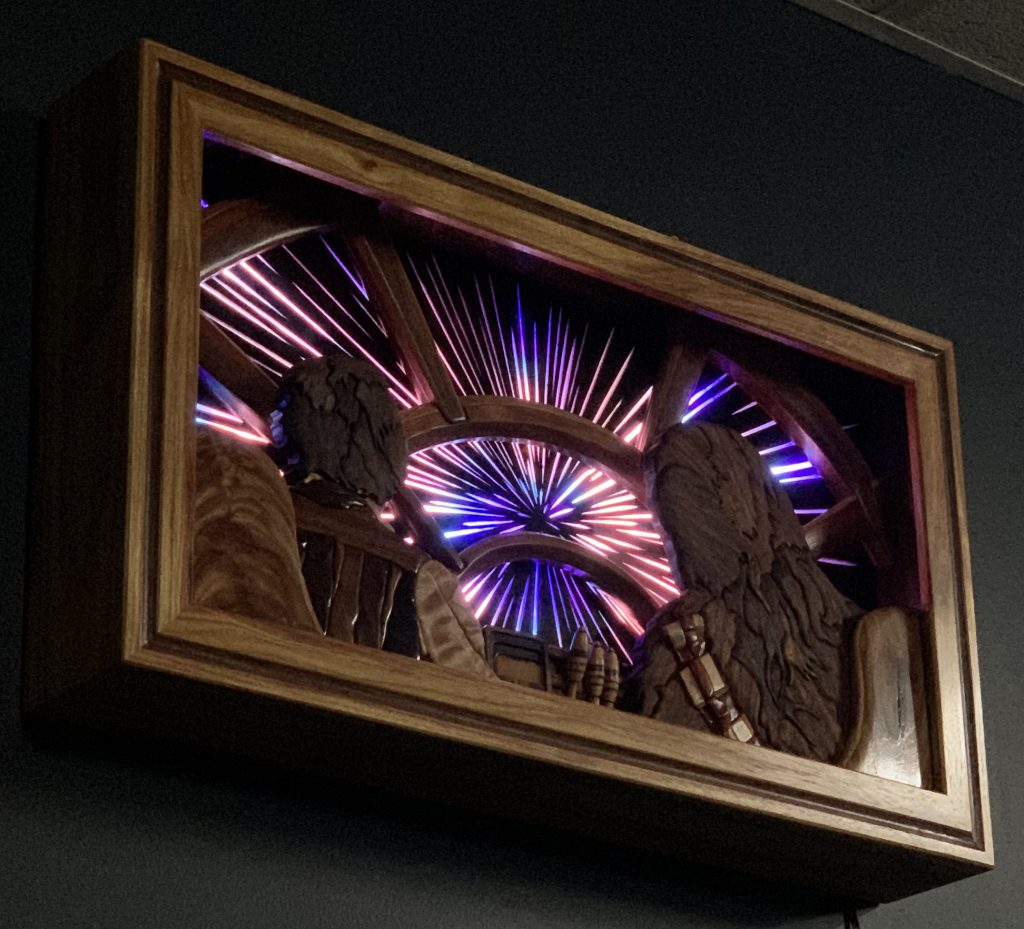
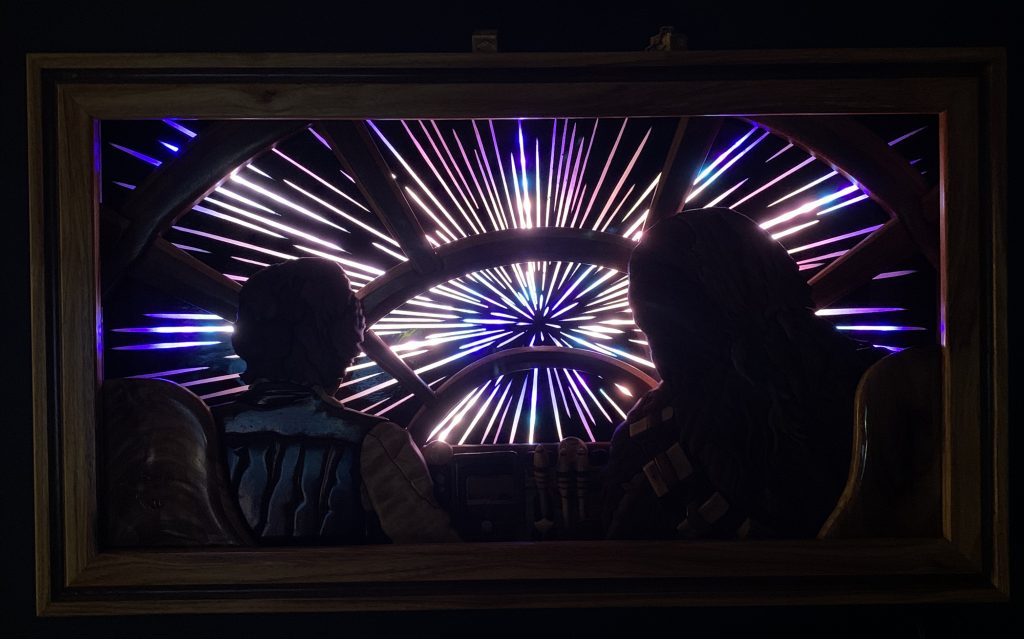
This piece depicting Chewbacca and Han Solo in the Millennium Falcon was intitially designed using Adobe Illustrator, based on a still frame from the movie. It was built over the course of 7 weeks from ~190 hand-cut (scroll sawed) pieces of wood from over 20 different species, most of it reclaimed. The star trails were also scrollsawed and filled with resin.

The wood

Most of the wood was reclaimed by me from various sources and includes: padauk, purpleheart, bloodwood, elm, spalted maple, sycamore, ebony, wenge, cherry, white oak, sapele, mahogany, pine, luaun ply, bamboo, unknown pallet & scrap wood. Chewie is made from a 1970s S. African stinkwood chair from my mother-in-law, a native South African. Han’s sleeve was curly maple given by the master woodworker Paul Jasper (@copper_pig_fine_woodworking). Some of the walnut was from local woodworker Matthew Plazek (@mpi_woodworking). Some of the exotics were a gift from guitar builder Russel Pfohl (@rapfohl). The rest came from Ocooch Harwoods and Rockler.

Electronics

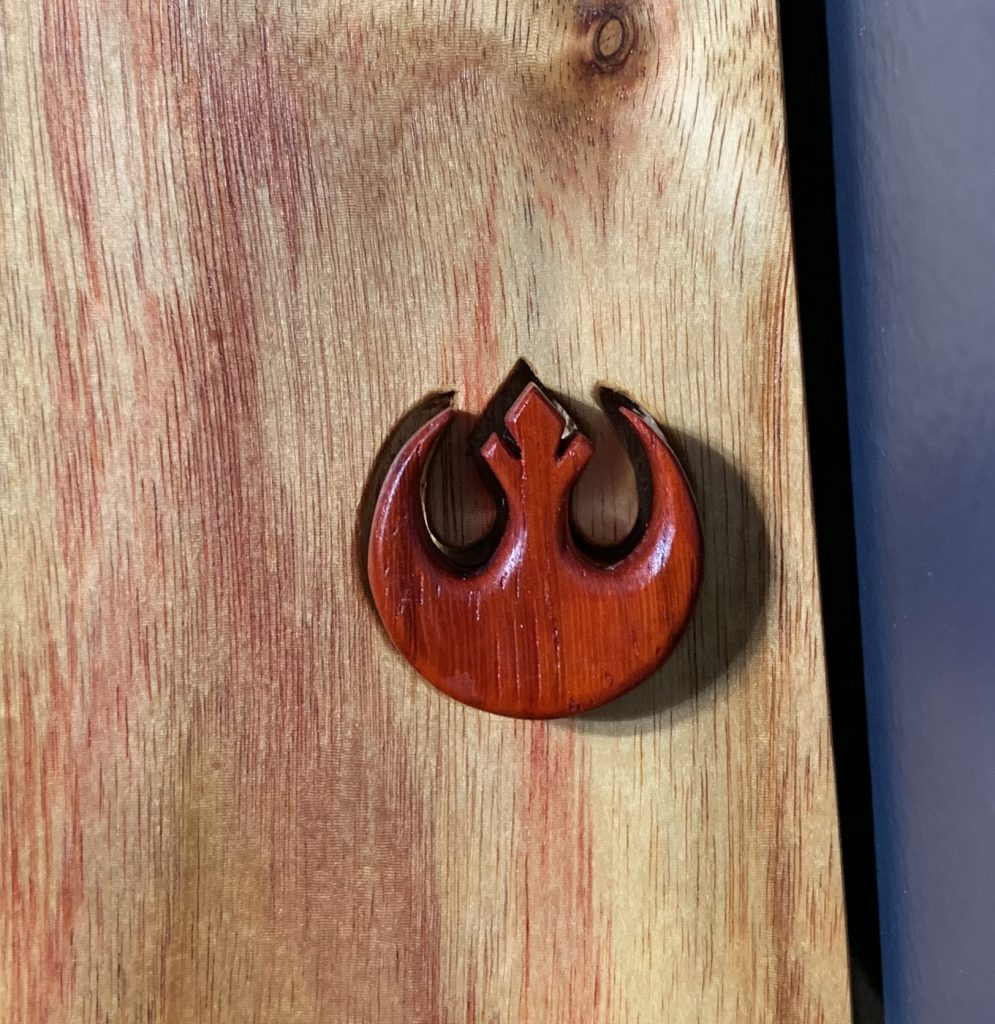
Although the original plan was much simpler, over the course of the project I ended up adding an Adafruit soundboard with 6 scores that play through 1 button (the small white one), and 10 movie dialogue clips that play through another (the left thruster stick). A rebel insignia button on the right of the frame powers the sound. Toward the end of the project, I decided to add radiating Adafruit DotStar LED strips controlled by three different programs I coded on an Arduino Uno, which can be switched by moving Han’s dice (made in a previous project), which contain an embedded magnet. The top of the frame has 2 hidden magnetic switches embedded within it. The light power is currently controlled by telling my phone “Hey Siri, punch it!” Or “Exit hyperspace”.

Note: this piece, like all of my derivative art, is not for sale. I don’t think I could part with it anyway. The entire process was documented in well over 200 Instagram stories, now highlighted on my profile in 3 parts. (Part 1, Part 2, Part 3)


I have to give HUGE heartfelt thanks to the many many people constantly offering encouragement and advice on Instagram. You’re seriously the only reason I posted all the build details. Of course, I’d like to thank George Lucas and the countless artists of all types who’ve made Star Wars such a fun Universe.

View this post on Instagram

“Punch it!”, Daniel D. Brown, 2019, handmade wooden multimedia intarsia artwork based on Star Wars. (The basic demonstration video) I built this artwork of Han Solo and Chewbacca in the Millennium Falcon over the course of 7 weeks from ~190 hand-cut (scrollsawed) pieces of wood from over 20 different species, most of it reclaimed. The star trails were also scrollsawed and filled with resin. Although the original plan was much simpler, over the course of the project I ended up adding a soundboard with 6 scores that play through 1 button (the small white one), and 10 movie dialogue clips that play through another (the left thruster stick). A rebel insignia button on the right of the frame powers the sound. Toward the end of the project, I decided to add radiating LED strips controlled by three different programs I coded on an Arduino, which can be switched by moving Han’s dice (from a previous project) containing an embedded magnet. The top of the frame has 2 hidden magnetic switches embedded within it. The light power is currently controlled by telling my phone “Hey Siri, punch it!” Or “Exit hyperspace”. I am planning a separate post for the details on materials, tools, and special thanks. Note: this is not for sale. This was for me alone. The entire process was documented in well over 200 stories, now highlighted on my profile in 3 parts. I have to give HUGE heartfelt thanks to the many many people constantly offering encouragement and advice. You’re seriously the only reason I posted all the build details. Of course, I’d like to thank George Lucas and the countless artists of all types who’ve made Star Wars such a fun Universe. … #starwars #starwarsday #starwarsfan #starwarsart #starwarsgeeks #starwarsnerds #maytheforcebewithyou #igwoodworker #igwoodworkingcommunity #woodworkingcommunity #woodworks #woodart #woodworking #woodworker #scrollsawart #maker #scrollsaw #intarsia #woodintarsia #millenniumfalcon #artistsoninstagram #artist #artstagram #solo #chewbacca #empirestrikesback #anewhope #returnofthejedi #disney #lucasfilm @crafttheforce

A post shared by Laughing Mantis Studio (@laughingmantisstudio) on

View this post on Instagram

“Punch it!” This post is to 1) show the sound clips included in the piece, 2) highlight the kind folks who provided help and 3) list the tools and materials used (I get many questions). See previous posts for info on the build. Special thanks to @cyclocrosscutter for convincing me to upgrade the sound, encouraging me with witty insults, and being an inspiration with his mediocre geek builds. Also to @worksbyahurst for generously sending me his sound files from his mind-blowing Millennium Falcon build. And to @hardwoodmikes for incredibly helpful coding advice. The wood: most reclaimed by me from various sources. Padauk, purpleheart, bloodwood, elm, spalted maple, sycamore, ebony, wenge, cherry, white oak, sapele, mahogany, pine, luaun ply, bamboo, unknown pallet & scrap wood. Chewie is made from a 1970s S. African stinkwood chair from @sledv_life_rocks . Han’s sleeve was curly maple given by the master woodworker/artist @copper_pig_fine_woodworking. Some walnut from woodworker @mpi_woodworking. Some exotics were a gift from guitar builder @rapfohl. The rest came from @ocoochhardwoods and @rockler_woodworking. My trusty scrollsaw: she’s not the best $ can buy but I’ve made some cool things with my @portercable w/ Flying Dutchman blades. Big cuts done on my sweet @rikon_powertools bandsaw, and @dewalttough table saw and planer. Drill press was a generous gift from my buddy @slapstufftogether (he carved a badass Yoda lamp that was an inspiration). Shaping is with @saburrtooth and @kutzall burrs on my @dremel. I’d be lost without my @ridgid and @boschtoolsna sanders (with @mirka_usa discs). I go through so much @starbondadhesives CA glue, @titebondproducts II, and @3m Super 77 spray and packing tape. @odiesoil and @generalfinishes for finishing. I used an @adafruit soundboard and their DotStar LEDs, as well as an @arduino.cc Uno to control them. Of course this thing would not exist without the IP created by George Lucas (@lucasfilm and now @disney). #starwars #starwarsfan #starwarsart #starwarsgeeks #igwoodworker #woodworking #woodart #scrollsawart #maker #scrollsaw #intarsia #woodintarsia #millenniumfalcon #empirestrikesback #anewhope #returnofthejedi

A post shared by Laughing Mantis Studio (@laughingmantisstudio) on

View this post on Instagram

Here’s the penultimate update on this wooden intarsia artwork entitled “Punch It”. In poor night-time indoor lighting. But you get the idea. I can now clearly see the finish line! In fact it’s already hanging in my man cave. I still plan to try installing some fancier programmed LEDs with an Arduino controlling it (many thanks to @hardwoodmikes for his advice and help today in planning). The current LED system is just taped in haphazardly (and why it’s dark around the edges). The rebel insignia power button has its polyurethane drying right now, so that’s not installed yet. But very soon I’ll be taking some final photographs and videos and call her done. I’m SUPER stoked with how the @adafruit soundboard worked out. And I am forever in the debt of @cyclocrosscutter for insulting me until I “went big or went home” in regards to not using a greeting card module. Thanks again to @worksbyahurst for some of the sound files. I have more people I will thank later for providing woods and tools. I plan on making a whole post dedicated to “materials and methods” on this build at some point. #starwars #starwarsday #starwarsfan #starwarsart #starwarsgeeks #starwarsnerds #maytheforcebewithyou #igwoodworker #igwoodworkingcommunity #woodworkingcommunity #woodworks #woodart #woodworking #woodworker #scrollsawart #maker #scrollsaw #intarsia #woodintarsia #millenniumfalcon #artistsoninstagram #artist #artstagram #solo #chewbacca #empirestrikesback #anewhope #returnofthejedi @craft_the_force

A post shared by Laughing Mantis Studio (@laughingmantisstudio) on

View this post on Instagram

Update. So here’s my finishing plan: I want the background to be glossy, Han’s jacket and Chewie’s bandolier leather to have a satin finish, the bandolier boxes to be semi-gloss, and Han’s hair and Chewie’s fur to have a softer natural wood finish. So I’m gonna use 3 @generalfinishes polyurethanes and @odiesoil. These are my two finishing brands I use in 99% of my projects, having tried a bunch. I have no idea how this will actually look together, but I feel like it may add a bit more depth to the piece. Some notes on finishing: I normally apply finish on intarsia pieces after putting everything together. But since I’m using 4 different finishes, pre-finishing is easier and will ensure I don’t get crossover. For the polyurethane I build up coats with gloss (sanding lightly at 800 grit between coats). The final coat is the desired final surface (gloss, semi, or satin). For the hair and fur, I’m trying something I’ve never done. After rough sanding I raised the grain with water and did NOT sand again. This tends to leave the wood a little fuzzy and my hope is that it will make the hair and fur look softer and more organic. Odie’s is my go to for natural wood finish. It’s gorgeous, has high moisture protection with only 1 coat, or occasionally 2 for thirsty wood. I apply, let it sit for 30 min, then rub it off and buff.

A post shared by Laughing Mantis Studio (@laughingmantisstudio) on

View this post on Instagram

Still a ways to go… A few answers, random thoughts, and things I wanted to say about this piece and my art: 1) The idea for this first came to me about a year and a half ago when I saw a huge decal of this scene on the back of a pickup truck window. It’s been percolating ever since, but I’d been too nervous to start it because I knew it was gonna be a long and challenging project. And I honestly wasn’t sure if I could pull it off or if it would even look cool. Hopefully it will! 2) Ive had a lot of people message asking if it’s a commission or for sale. For me it’s the best kind of project – I’m the client, no deadline, no pressure, and no real goal other than making something this silly geek will consider epic hanging in our “Lair”. It’s not really for sale. That being said, I’d let go of almost anything I make for a price. But for this piece it’d have to be a ”Harrison Ford Star Wars money” price. Do any of you know Harrison Ford? 😂🤣😂 3) I’ve only been making wood art pieces like this for ~3 years and I started with just a cheap big box store jigsaw (and almost zero knowledge or skill). Most of my tools are Craigslist, hand me downs, and a precious few were big ticket items I saved up for. Most of my wood is reclaimed – scavenged here and there, with some exotic exceptions. I’m almost 42 years old now (yikes!). The point being: if you really want to learn to make or do cool things, regardless of the field, you almost certainly can do it. I started by reading a couple books and watching countless YouTube videos. Now when I need help or advice (which is often), I seek out others here in the IG community I’ve met. I don’t believe I have any special skill or talent. I’ve just practiced a bit. I do have patience (that part is required, but can also be learned). That’s all for now. … #starwars #starwarsday #starwarsfan #starwarsart #starwarsgeeks #starwarsnerds #maytheforcebewithyou #igwoodworkingcommunity #woodworks #woodart #woodworking #woodworker #scrollsawart #maker #scrollsaw #intarsia #woodintarsia #millenniumfalcon #artistsoninstagram #artist #artstagram #solo #chewbacca #empirestrikesback #anewhope #returnofthejedi #pittsburghwoodworking

A post shared by Laughing Mantis Studio (@laughingmantisstudio) on

View this post on Instagram

Han & Chewie progress update: I’m slowly building up the layers, an hour or two per day, shaping pieces here and there. I’ve started at least a first attempt at the hyperspace background by ebonizing a walnut panel with some old vinegar/steel wool mix I made 2 years ago. I’m still doing some other small tests before I decide how exactly to attempt the star trails. Still many many hours to go on this thing. But I’m pretty excited about it so far! … #starwars #starwarsday #starwarsfan #starwarsart #starwarsgeeks #starwarsnerds #maytheforcebewithyou #igwoodworker #igwoodworkingcommunity #woodworkingcommunity #woodworks #woodart #woodworking #woodworker #scrollsawart #maker #scrollsaw #intarsia #woodintarsia

A post shared by Laughing Mantis Studio (@laughingmantisstudio) on

Hippocampus, Daniel D. Brown, 2018

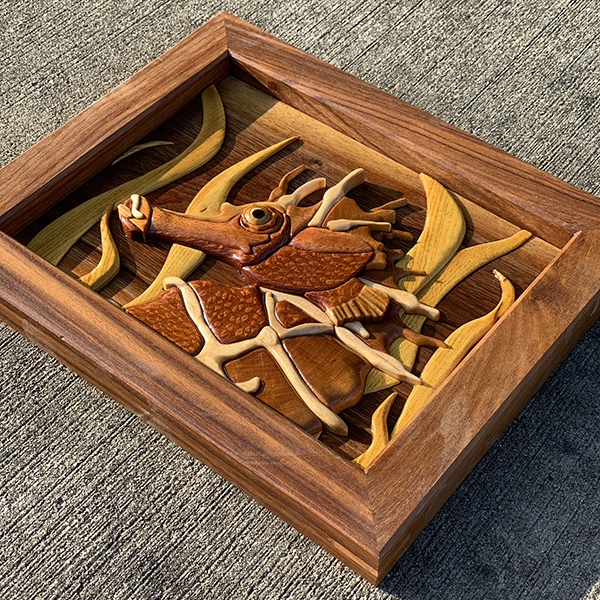
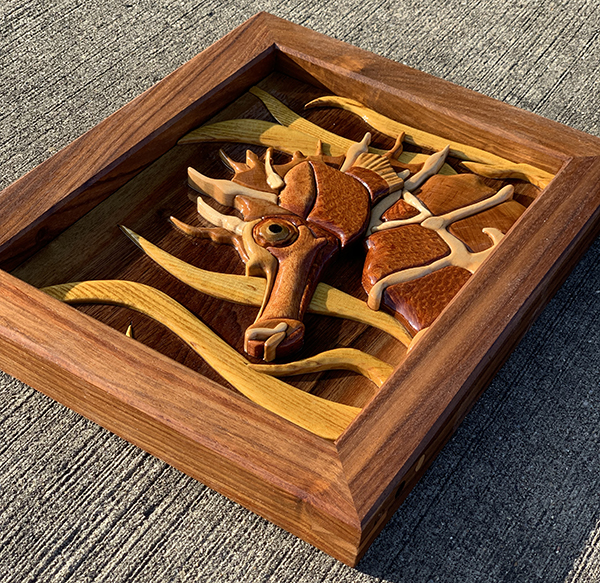
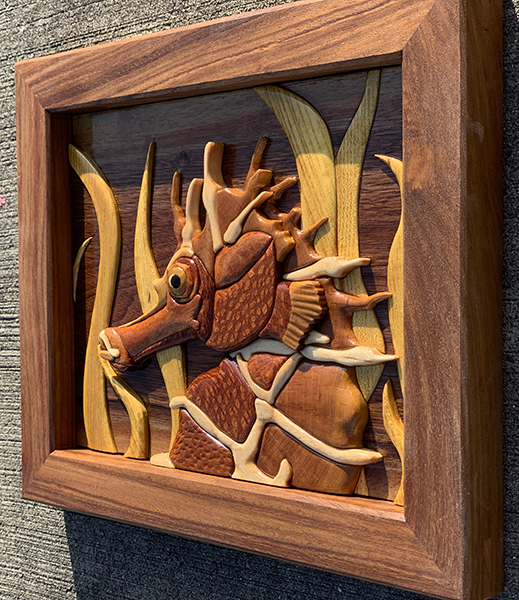
Wooden intarsia seahorse artwork, built from lacewood, cherry, mahogany, maple, walnut, mulberry, bloodwood, purpleheart, and ebony. The frame was made from reclaimed furniture: either black stinkwood or muninga (unclear which). The mulberry and cherry were milled myself from downed neighborhood trees. The frame wood came from a couple antique chairs purchased by my mother-in-law in Cape Town, S. Africa in the 1970s.
My final project of 2018 is now complete!

Posts during the making of…

View this post on Instagram

The purpose of this post is to talk for a minute about this super cool wood I’m using to make this frame. This is supposedly antique South African “black stinkwood” (Ocotea bullata), also called “cape walnut”. My mother-in-law @avrashorkend, a South African herself, bought a couple antique chairs made from this wood in the 1970s. She and my step-dad-in-law no longer wanted them, so we cut them up with a sawzall over thanksgiving and I brought the pieces home. Stinkwood used to be prevalent on Table Mountain in Cape Town, which @tam_a_ryn and I visited when we got married (she spent her childhood there). But the black stinkwood was massively overexploited by the timber/furniture industries in the ‘70s and was eradicated from most of its previous habitat. It’s now a protected species and no longer commercially available. It’s name apparently comes from the smell when it’s freshly felled. But I can tell you, this who-knows-how-old wood smelled *really* good in my shop. It actually smelled very similar to that characteristic sweet smell of African padauk. Thus, with the smell and comparing the grain to the limited images I could find online, I think there’s a decent chance this wood is actually Pterocarpus angiolensis (Muninga or African teak), which is closely related to padauk (Pterocarpus soyauxii). This species is not CITES-listed and often used in furniture. It’s also known for being a pretty hardcore nasal irritant; and this wood made me sneeze and my nose run within a minute of taking off my mask with a little dust still in the air – more so than any other wood I’ve worked. Either way, it’s pretty cool to use these pieces in my artwork. If you or anyone you know is an expert in exotic African woods, feel free to add your 2 rand. #stinkwood #muninga #africanwood #padauk

A post shared by Laughing Mantis Studio (@laughingmantisstudio) on

View this post on Instagram

Just a random little intarsia begin this evening.

A post shared by Laughing Mantis Studio (@laughingmantisstudio) on

I Hear You Have Crabs #2, Daniel D. Brown, 2018

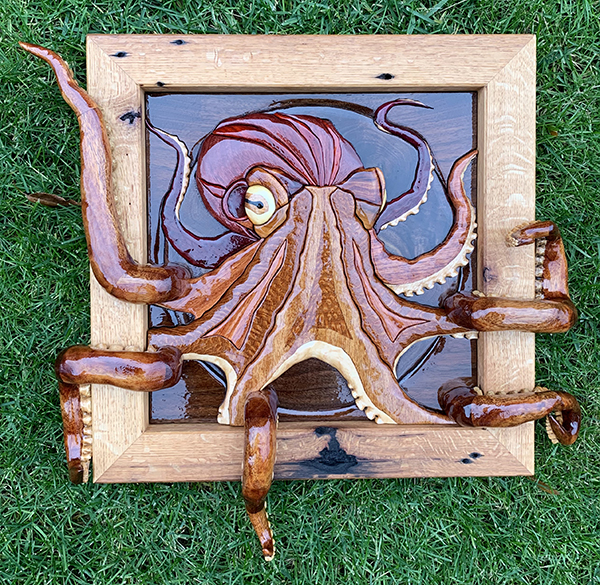
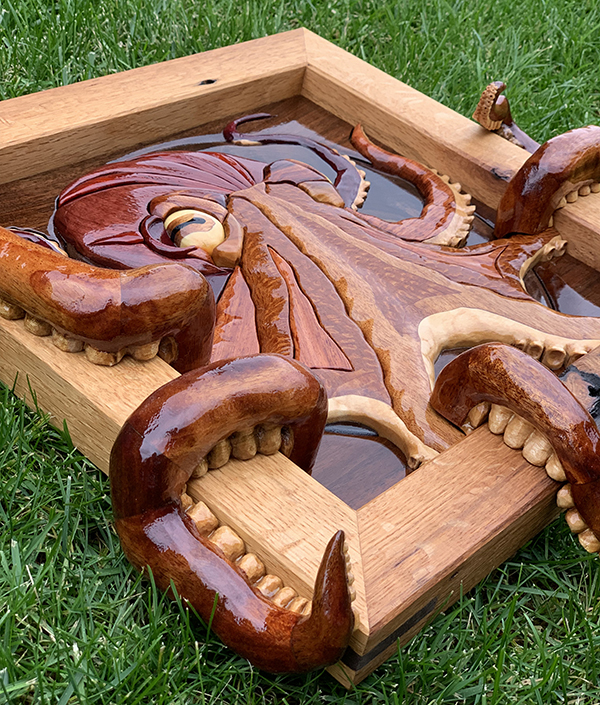
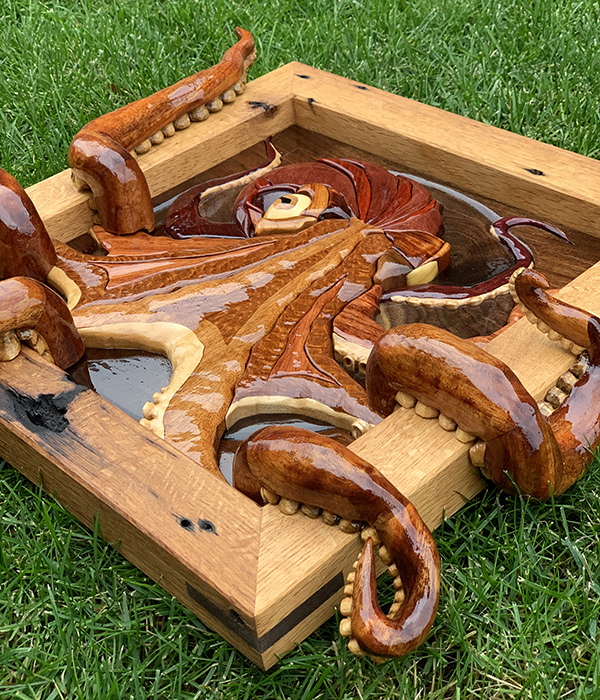
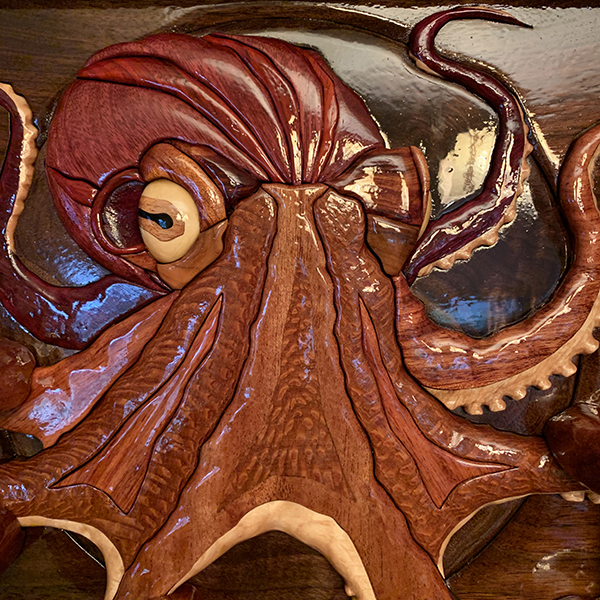
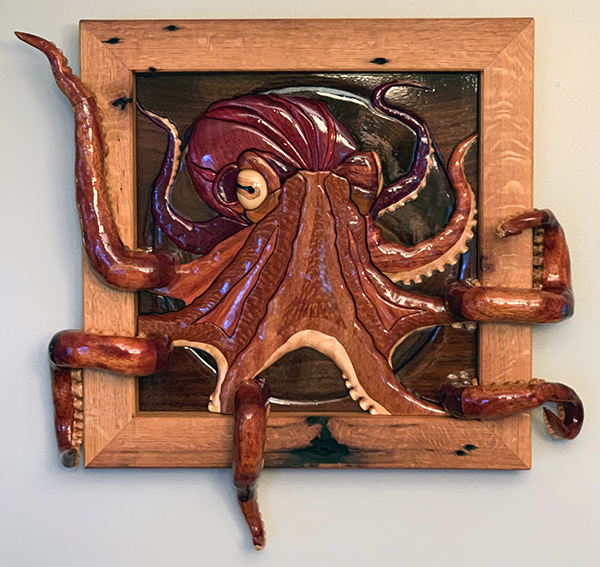
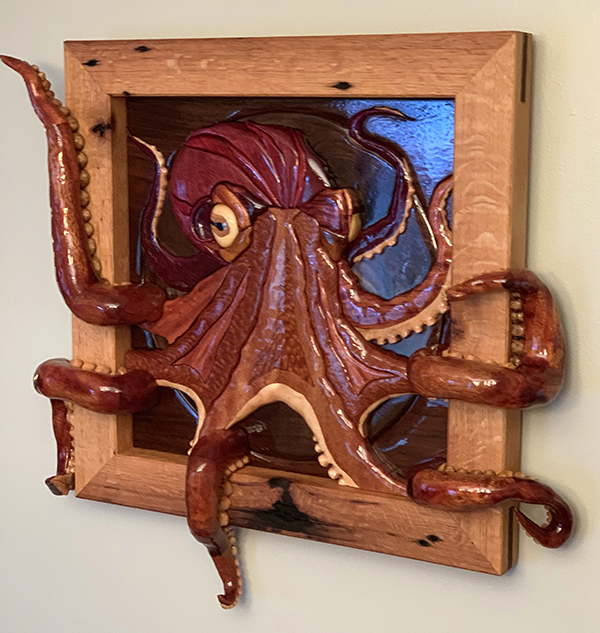
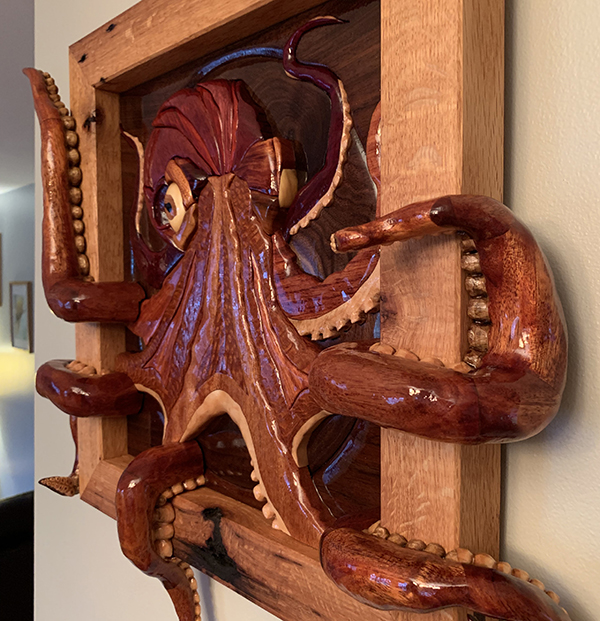
It is finished!
Wow, this was a long series of posts (on IG). Hopefully one or two of you enjoyed it as much as I did making it. Here are a bunch of shots in various lighting.
Built from mahogany, sapele, lacewood, maple, purpleheart, bloodwood, padauk, cherry, ebony, aspen, walnut, and 150 year old white oak.
My initial inspiration for this was a painting/sculpture I did on canvas and MagicSculpt, which I sold years ago. I missed it and wanted to recreate something like it.

I cut the intarsia background on a scrollsaw, lumber was all milled on my table saw & planer, arms were cut with bandsaw, Dremel (with absolutely critical shaping burrs), 106 knife, and a handful of chisels and gouges. Octopus finished with Clear Gloss and frame with Simple
Finish. CA glue was used in the intarsia and TBII in the frame and backer.

Posts during the making of…

View this post on Instagram

“I Hear You Have Crabs: #2” It is finished! Wow, this was a long series of posts. Hopefully one or two of you enjoyed it as much as I did making it. Here are a bunch of shots in various lighting. Built from mahogany, sapele, lacewood, maple, purpleheart, bloodwood, padauk, cherry, ebony, aspen, walnut, and 150 year old white oak. My initial inspiration for this was a painting/sculpture I did on canvas and MagicSculpt (swipe to the end), which I sold years ago. I missed it and wanted to recreate something like it. … I cut the intarsia background on a @portercable scrollsaw, lumber was all milled on my @dewalttough table saw & planer, arms were cut with @ryobipowertools bandsaw, @dremel (with absolutely critical @saburrtooth shaping burrs), @morakniv 106 knife, and a handful of Pfeill chisels and gouges. Octopus finished with @minwaxusa Clear Gloss and frame with @makerbrandco Simple Finish. @starbondadhesives CA glue was used in the intarsia and @titebondproducts II in the frame and backer. … #woodworking #intarsia #scrollsawart #octopusart #cephalopod #makersgonnamake #madeinpittsburgh #pittsburghartist #woodenart #handmade #sculptureart #woodsculpture #woodenart #woodart #woodworkersofinstagram #woodworkingcommunity #handmade #oceanart #pittsburghwoodworking

A post shared by Laughing Mantis Studio (@laughingmantisstudio) on

View this post on Instagram

“I Hear You Have Crabs: #2” Step 14: First coat of gloss on the intarsia octopus! Those colors! The reason I want the wood to be darker and redder toward the back is to sort of simulate light in the depth of the ocean (which becomes more red the deeper you go as the blue gets scattered and filtered out). I want it to feel like he’s crawling out of the frame to get your crabs (crab legs are my favorite food too). It’s not perfect, but I dig the look. I rarely use high gloss finishes, but this is a perfect situation to go with @minwaxusa Clear Gloss polyurethane. Plus it’s what I have on hand and I know what to expect from it. As mentioned before, the goal for the octopus is to have a “wet” look. As with the protruding arms, after this dries I’ll hit it with some @mirka_usa 400 grit (and higher) nets and reapply at least a couple times. #woodworking #intarsia #scrollsawart #octopusart #cephalopod #makersgonnamake #madeinpittsburgh #pittsburghartist #woodenart #handmadeart

A post shared by Laughing Mantis Studio (@laughingmantisstudio) on

View this post on Instagram

“I Hear You Have Crabs: #2” Step 13: Apply finish to the frame. Because the octopus will be glossy to look wet, I wanted a nice natural finish to the frame. So the perfect oil finish to use was of course the @makerbrandco Simple Finish I used on the Three Rivers side table. It has good penetration, it’s super easy to apply, and it lets the wood do all the talking. I also double checked, and this old barn wood I acquired a while back is actually about 150 years old. Check out those ray flecks in this old white oak! I taped up the dowel holes to keep the wood clean for glueing the octopus arms (side note: I just learned that technically, octopuses don’t have “tentacles”. They have arms. Squid have 6 arms and two tentacles, with tentacles being defined has having suckers only at the tip or not at all in the case of nautiluses. Arms have suckers along the entire length.). #scrollsaw #scrollsawart #octopusart #madeinpittsburgh #woodworking #cephalopod #pittsburghartist

A post shared by Laughing Mantis Studio (@laughingmantisstudio) on

View this post on Instagram

“I Hear You Have Crabs: #2” Step 11: finish the frame, add miter splines, and figure out how to attach the tentacles. Okay so we may have taken too many photos just having fun with the tentacle frame. We needed some laughs (see previous post). I chamfered and glued up the barn wood white oak frame, added walnut splines with my tables saw jig, and finally decided to attach the tentacles to the frame with dowels, which worked wonderfully. This will make it easier to apply finish to them before permanently attaching. I also spent quite a few hours whittling those suckers and grinding/sanding them with tiny dremel bits and a whole series of gouges and knives. #woodworking #scrollsawart #intarsia #octopusart #madeinpittsburgh #pittsburghartist #woodenart #woodcarving

A post shared by Laughing Mantis Studio (@laughingmantisstudio) on

View this post on Instagram

“I Hear You Have Crabs: #2” Step 10: Busy my hands and await personal and tragic news. This is a tough one to write, but I’m gonna write it anyway because it’s real life. And because it’s a perfect illustration of how art is a necessary release of stress for me personally. For the past week, my step-father has been undergoing surgeries to replace an infected vascular graft. Several complications ensued and it became clear that his body could not handle it. So I took off work and spent today awaiting the call that they had removed the ventilator and he had passed. The details of all this and what we lost in his passing I will keep to my private/personal page (and I don’t need condolences here). The reason I am telling you this is because this piece I’m making became integrally involved in getting me through today, especially being so far from my family. In between moments of staring at the floor, texting and calling my family, feeling my heart break, and drowning in anxiety, I *tried* to calm my mind by putting my hands to work. I meditated on my time with Jack and what he meant to his loved ones. All of that is now forever in this piece to me. And I simply can’t continue with this silly little “making of” series without including it. I love you, Jack.

A post shared by Laughing Mantis Studio (@laughingmantisstudio) on

View this post on Instagram

“I Hear You Have Crabs: #2” Step 9b: More tentacle shaping. Spent the morning in the shop pre-power tool time (wife and pup still asleep) whittling up the first tentacle in front of a portable heater while catching up on the @madeforprofit podcast. A couple hours later, I started cutting more pieces for the 4 tentacles. By the way, I highly recommend thr @madeforprofit podcast by @john_malecki and @fixthisbuildthat. I’m actually actively avoiding trying to do woodworking/art for money these days. I do this for stress release. But it’s still an incredibly interesting and inspiring podcast just listening to the stories, goals, practices, and mentalities of other makers. I particularly enjoyed the show with @jkatzmoses.

A post shared by Laughing Mantis Studio (@laughingmantisstudio) on

View this post on Instagram

“I Hear You Have Crabs: #2” Step 9: begin building & rough-shaping tentacles! That one tentacle is nowhere close to done (spritzed with water to see color). I’ve only very roughly shaped it. The rest are still in pieces, with several still to cut. You can see how I’ve decided to make these (swipe). I’ve made it tricky on myself by wanting to make the suckers and the ventral side of each tentacle out of maple, similar to the intarsia part. And I don’t want it to be just a straight line as if I slapped a piece of maple to mahogany. So I’m cutting curves on each piece, then matching that curve with the maple (little bandsaw). Then I have to cut angles in the pieces to fit them together. It’ll look cooler once they have more organic shapes. But man they start off ugly!! I couldn’t really think of a better way to have continuous tentacles, curving through 3D space and having two layers following that curve. But I think this will turn out okay. However, it’s gonna be a bitch carving all those suckers! Note: I haven’t put the frame together yet. It’s just taped for now. #intarsia #octopusart #woodworking #madeinpittsburgh #pittsburghartist

A post shared by Laughing Mantis Studio (@laughingmantisstudio) on

View this post on Instagram

“I Hear You Have Crabs: #2” Step 4: Attach templates to the wood while wearing a Chewbacca pajama onesie in between handing out candy to children with @tam_a_ryn. I first put down a layer of @3m packing tape (cheap stuff won’t do for this), then adhere the paper to the tape with 3M Super 77 spray adhesive. I’ve tried multiple methods, glues, and tapes, and this is what works best for me – it leaves almost zero glue residue and I rarely have problems with lifting of the tape. Yet I can still remove it fairly easily and cleanly. Using tape also helps lubricate the blade. This is also when I actually choose the grain direction/figure/color as I lay down the templates.

A post shared by Laughing Mantis Studio (@laughingmantisstudio) on