The Cretacious-Tertiary Boundary
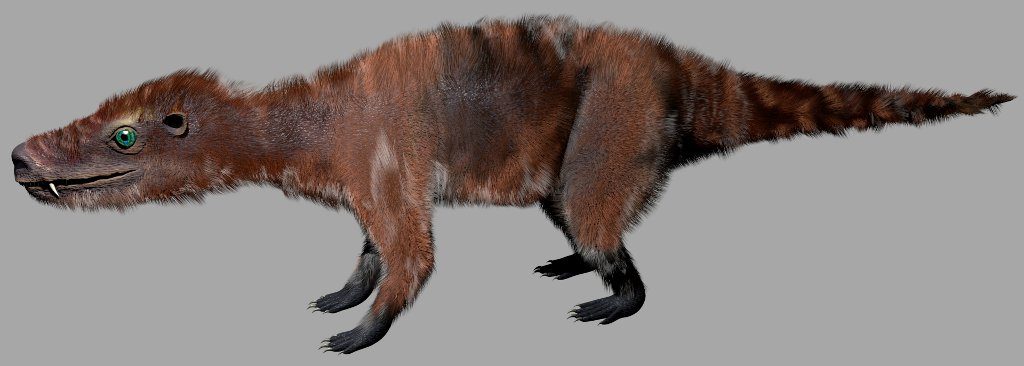
Sixty-five million years ago, a daily struggle occurs in the midst of the world-changing event that would result in the demise of the non-avian dinosaurs and the rise of our own lineage of mammals. The layer of rock demarkating the end of the Cretaceous and beginning of the Tertiary is known by geologists as the “K-T Boundary.” The mammals in this case are “cynodonts” – our ancestors in the late Cretaceous. This took me three weeks to create, using Blender and GIMP software packages.
“K-T” Detail
CLICK HERE to see how this piece (and generally all my 3D art) is made.
I know of at least a couple of people who were curious how I went about making my latest art, “K-T.” Here is an abbreviated walkthrough…
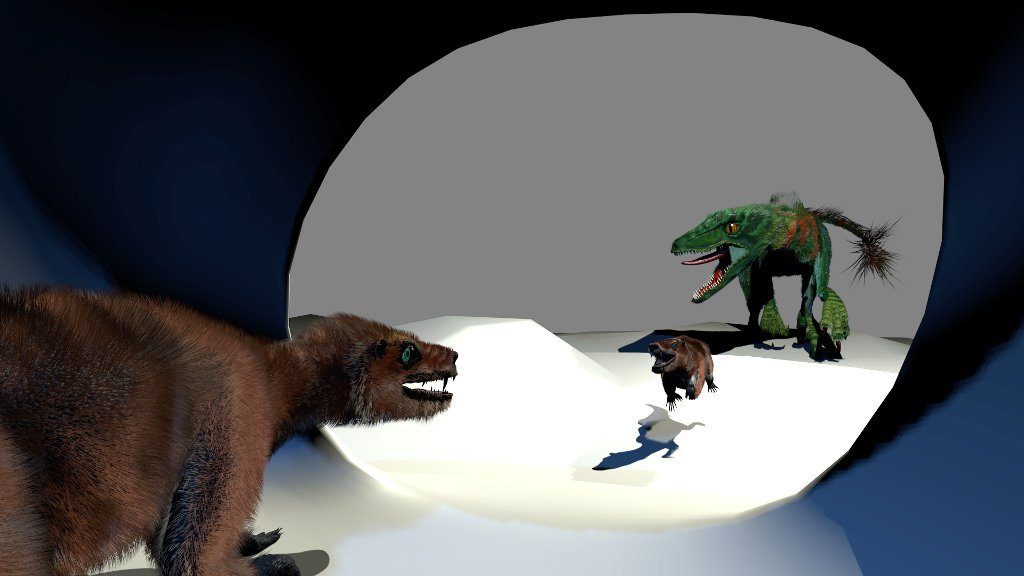
“K-T”
First came the idea. I’ve had the general idea of the composition in my head sometime: a view from a mammal ancestor’s burrow of the distant K-T meteor.
When I decided to actually make it with the free and open-source Blender and GIMP, I first made a very quick (like 5 minute) sketch of my idea layout:
Hilarious sketch up of the idea. Looks like it was made by a two-year-old.
Next up: modeling the creatures. All objects are modeled as a 3D mesh, working with them and sculpting them at times much like clay – except it’s all in the computer.
Velociraptor polygonal meshVelociraptor Model – color and shadow to help see shape.
Next up comes the coloring, texturing, and addition of fur.
Velociraptor Texturing and Fur – an early test
In reality, the coloring and texturing is done on 2D images (using the free photoshop-like GIMP), which are then mapped onto the 3D mesh:
Velociraptor Color Map
Next up: a poseable armature has to be made and applied to the 3D mesh. Think of this as an actual skeleton that the mesh will deform with.
The armature has to be tested with lots of poses to make sure the mesh warps correctly.
Smile for the camera!
Rinse and repeat for the other objects:
Your great x 10 to the alot grandpa
Now start putting objects into the scene:
More detail
And finally we have everything in place
Scene MeshScene solid objects
At this point alot of time is put into positioning lights and tweaking textures so that everything looks good. Lighting is probably the hardest thing to get right (especially with fur).
Finally, the image is rendered and the image levels and coloring and effects are tweaked using GIMP.
“K-T” Detail
All in all, the entire process took 3 weeks. I could have easily spent another 3 weeks tweaking and fixing many aspects of the piece and adding more details, but I was pretty much ready to move on to something else. So, I got it to the point where I was happy with it as is.